Tuesday, April 1, 2014

SoundPi - Initial Setup

These are my notes from setting up a headless Raspberry Pi to act as a Squeezebox Client and a Bluetooth audio endpoint.

Image
I got the image to install from http://downloads.raspberrypi.org/raspbian_latest.

SD Card Setup (on OS X)
Instead of downloading a special tool, I just used what was built in to OS X. It worked fine.

diskutil list
diskutil unmountDisk /dev/disk3
sudo dd bs=1m if=2014-01-07-wheezy-raspbian.img  of=/dev/rdisk3
diskutil unmountDisk /dev/disk3


Base Raspberry Pi Setup
Airport Extreme (my main wifi access point) doesn't have a good way of finding the DHCP clients. Instead I just starting sshing to addresses at the start of the reservation range until I found my pi at 192.168.0.7.  (A better way, arguably, would be to do an nmap scan, or use a wifi router that lets you see the client addresses).

Once logged in I ran:
sudo raspi-config
To configure basics like hostname, change the pi password and update the tool, etc...
ifconfig
To figure out what the mac address was so that I could set a DHCP reservation for that client so that the IP address wouldn't change again.

I then cribbed some commands from http://glynrob.com/hardware/raspberry-pi-headless/ to get the base OS update to date:
sudo aptitude update 
sudo aptitude dist-upgrade

WiFi Setup
I have a Panda Wireless wifi adapter (enumerates via lsusb as 'Ralink Technology, Corp. RT5370 Wireless Adapter').  I followed these instructions to hook it to my local wifi network (using DHCP): http://kerneldriver.wordpress.com/2012/10/21/configuring-wpa2-using-wpa_supplicant-on-the-raspberry-pi/

This worked, but I was getting extremely high ping times.

64 bytes from 192.168.0.10: icmp_seq=445 ttl=64 time=434.857 ms
64 bytes from 192.168.0.10: icmp_seq=446 ttl=64 time=138.993 ms
64 bytes from 192.168.0.10: icmp_seq=447 ttl=64 time=59.932 ms
64 bytes from 192.168.0.10: icmp_seq=448 ttl=64 time=184.787 ms
64 bytes from 192.168.0.10: icmp_seq=449 ttl=64 time=105.108 ms
64 bytes from 192.168.0.10: icmp_seq=450 ttl=64 time=26.188 ms
64 bytes from 192.168.0.10: icmp_seq=451 ttl=64 time=150.148 ms

64 bytes from 192.168.0.10: icmp_seq=452 ttl=64 time=172.865 ms

Numbers like this aren't really acceptable.  Some brief investigation led me to this post, which suggests seeing if 'sudo iwconfig wlan0 power off' would solve the problem.  It did. Immediately after running this command my ping times fell.

64 bytes from 192.168.0.10: icmp_seq=775 ttl=64 time=103.008 ms
64 bytes from 192.168.0.10: icmp_seq=776 ttl=64 time=2.566 ms
64 bytes from 192.168.0.10: icmp_seq=777 ttl=64 time=6.522 ms
64 bytes from 192.168.0.10: icmp_seq=778 ttl=64 time=3.317 ms
64 bytes from 192.168.0.10: icmp_seq=779 ttl=64 time=2.228 ms
64 bytes from 192.168.0.10: icmp_seq=780 ttl=64 time=5.511 ms

I then added the line 'wireless-power off' to /etc/network/interfaces. This turns off power management for the 802.11 interface.

Here's the final contents of /etc/network/interfaces:
auto lo

iface lo inet loopback

auto eth0
allow-hotplug eth0
iface eth0 inet dhcp

allow-hotplug wlan0
# have to use 'manual' with wpa-roam
iface wlan0 inet manual
wpa-roam /etc/wpa_supplicant/wpa_supplicant.conf
wireless-power off

iface default inet dhcp

To make sure wireless comes up at every boot I added the following to /etc/rc.local

# Make sure wireless comes up
sudo ifup wlan0

After all this I encountered the problem that if I plugged in ethernet, it would shutdown wifi.  This was because of ifplugd.  The simple solution is just to uninstall ifplugd (from http://www.raspberrypi.org/phpBB3/viewtopic.php?f=36&t=67761).

sudo apt-get purge ifplugd

This has the side-effect of leaving eth0 up even after it isn't connected.  This may or may not be a problem.  There's likely a better way to do this (some of which I tried with no immediate luck).

That's the basic setup.  Next time, configuring bluetooth audio.

Wednesday, October 2, 2013

Python-gnupg on a Raspberry Pi

Installing Python-gnupg (http://pythonhosted.org/python-gnupg/) on a Raspberry Pi shouldn't be much different than installing it on any other *nix system.  I'm documenting it here just for my own personal notes.

Install gnupg
This goes pretty much like you'd expect:

sudo apt-get install gnupg

Install Python-gnupg
First we need pip (and setup_tools, ...):
sudo apt-get install python-dev
wget https://bitbucket.org/pypa/setuptools/raw/0.8/ez_setup.py -O - | sudo python
curl -O https://raw.github.com/pypa/pip/master/contrib/get-pip.py
sudo python get-pip.py

Now we can get gnupg:
sudo pip install python-gnupg

Basics
The following script creates a key using gnupg and installs that key in ~/.gnupg:
import gnupg

gpg = gnupg.GPG()

# generate a key
# first we need the input data
# really we shouldn't use key lengths shorter than 2048
input_data = gpg.gen_key_input(key_type="RSA", 
                               key_length=2048,
                               name_real="Tom",
                               name_comment="Test key",
                               name_email="tom@inyourbits.com")
key = gpg.gen_key(input_data)
print key.fingerprint

Not Fast Enough
The script above works (and doesn't do much), but takes a long time to run.

pi@3-14159 ~/gnupgTesting $ time python gpgtest.py 

real 6m4.396s
user 0m6.270s
sys 0m0.140s

This can be sped up by install rng-tools, however rng-tools requires a hardware random number source.

The Raspberry Pi has a hardware component for random number generation, but the software for it was just recently released.  (http://scruss.com/blog/2013/06/07/well-that-was-unexpected-the-raspberry-pis-hardware-random-number-generator/).

You may need to completely update your Pi (see the instructions in the link above), but I was able to get away with just this (and adding bcm2708-rng to /etc/modules):
sudo modprobe bcm2708-rng
sudo apt-get install rng-tools

Now performance is much better.

pi@3-14159 ~/gnupgTesting $ time python gpgtest.py 

real 0m5.524s
user 0m4.070s
sys 0m1.060s

Encrypting Data
In this example, 'bob@inyourbits.com' is the intended recipient (we've previously imported Bob's key) and "hello world" is the data we're going to encrypt.


>>> import gnupg
>>> gpg = gnupg.GPG()
>>> encrypted_data = gpg.encrypt("hello world", "bob@inyourbits.com")
>>> print encrypted_data
-----BEGIN PGP MESSAGE-----
Version: GnuPG v1.4.12 (GNU/Linux)

hQEMA4/T/riECknHAQf/cZWpMb4T4hwADtY+gS+0H0yKyKeq7hR6VFb2GGsGoRwW
uGiw63grv1HTMr5tiiOGtZgR3BvVsHJkgU6aeIwe3oqNlrQv2kEgu4IDe8vYNgqA
1M4KuNfFPvpk0wPrOFgmUIf5wxJwKGvo9gWR89pnti1zpAwPWFEplm/cRcEf3XQV
KmsiVCSdY22/14gv2XRh5wM/gzpjwI96RsmBPmSFZvkpBl8h9W5IZsq87oOmxg60
yLIkf1R9wm+EDukjAuhMQ+C0i/+ThiHp87I8LZD7kmzMot19+q4xiA5geetAgcwh
pDUCFwCjYSHVIf2Q//epRtEHfYCSQaJTO+WQcIaDCdJGAWQkJsdoDnlTMDYCwIth
cPLOMf1eWJGBThLwPOl1Rji9GqO0GX7dyvGDWTv89GvWD69phMyn+UAo5pOCtD/d
OBPVk+WSlg==
=sTPy
-----END PGP MESSAGE-----

Decrypting Data
Here we decrypt the data sent to Bob (we must have Bob's private key installed for this to work).  Note the use of str() around 'encrypted_data'. That's because .encrypt doesn't return a string, but rather something that can be turned in to a string.

>>> decrypted_data = gpg.decrypt(str(encrypted_data))
>>> print decrypted_data
hello world

Pesky Details
In this example I had the private keys for both parties installed on my system. That's not realistic, but it's enough to become familiar with the software before starting to much around across systems.  Key distribution is often hard.  Regular gpg can be used to do the key management if you don't need to do it in python. It's probably easier that way.

Tuesday, April 16, 2013

ABA: Arduino + Bluetooth + Android

The Bluetooth module for my Arduino (the JY-MCU) arrived a few weeks ago.  It was really inexpensive ($8.20), but took a long time to ship (3 weeks or so).  I picked it up from Deal Extreme (http://dx.com/p/jy-mcu-arduino-bluetooth-wireless-serial-port-module-104299).

Connecting

I followed some of the instructions from http://www.hobbycomponents.com/index.php?route=product/product&product_id=116 that showed I had to connect VCC to the 5V pin, Ground to Ground (duh), the Bluetooth module's TXD to Arduino pin D10, and the Bluetooth module's RXD to Arduino pin D11.  In the end it looked like this:

Be sure you hook it up correctly! One of the disadvantages of this Bluetooth module is that it apparently doesn't have any power protection.  So you could easily short it out and release the magic smoke.

Once it was powered on I was able to scan for it using my Android phone and pair with the Bluetooth module (It shows up as 'linvor' and the pairing code is 1234).

Programming the Arduino
The next order of business is programming the thing.  I'm not looking to do exactly what this instructable did, but it's a good place to start: http://www.instructables.com/id/Androino-Talk-with-an-Arduino-from-your-Android-d/

I used this code for inspiration (I'm not using the same pins as the instructable [it interferes with the normal serial port on the arduino] so I needed to use the software serial port instead): http://pastebin.com/raw.php?i=xmyr840j and wound up with this:

#include <SoftwareSerial.h>
#define BT_SERIAL_TX_DIO 10
#define BT_SERIAL_RX_DIO 11

SoftwareSerial BluetoothSerial(BT_SERIAL_TX_DIO, BT_SERIAL_RX_DIO);
const int SENS_PIN = A0;
const int LED_PIN = 13;

int sensorValue = 0;
boolean toggle = true;
void setup() {
    Serial.begin(9600);
    BluetoothSerial.begin(9600);
}

void loop() {
    if (BluetoothSerial.available()) {
        BluetoothSerial.read();
        BluetoothSerial.println("hello world");
        digitalWrite(LED_PIN, toggle); // toggle the LED
        toggle = !toggle;
    }
}


Programming Android
Following the instructable I installed:

http://code.google.com/p/android-scripting/
http://code.google.com/p/python-for-android/

For python for android I installed 'Python3ForAndroid_r6.apk'.  Once it's installed  you actually have to start the application (called 'Python3 for Android') and click 'Install' to let it install whatever it needs before you can go any further.

Now I don't have the sensor they're using, so I'm just using this as a quick example to get an LED blinking.

I also followed the instructions and  put the code from http://pastebin.com/raw.php?i=FVxKzf1g in to a file named androino.html and the code from http://pastebin.com/raw.php?i=XEmEsATU in to a file named androino.py

I started SL4A on my Android (to make sure it could create its directories before I uploaded anything).  Then I plugged the phone in to my computer and copied the androino files above to /sdcard/sl4a/scripts/.

Blink Lights

Open the SL4A app and click the 'get sensor data' button.  The LED should toggle (and 'hello world' should show up on the webpage on your Android)

It ain't pretty and definitely needs some work, but it was pretty easy (took maybe 30 minutes total).  Now I can blink an LED on the Arduino wirelessly using Bluetooth.  That's not much, but triggering other hardware should be pretty similar.  That's for next time.

Tuesday, March 5, 2013

Arduni-nano

I just purchased an Arduino Nano (http://arduino.cc/en/Main/ArduinoBoardNano).  The photo in that link shows the 2.2 version, but I received the 3.0 version (pictured below).  I have a number of ideas for what I'd like to do with it, but the first order of business is getting anything to run.

Arduino Nano 3.0

My platform is Windows, so I'm basically following the instructions here.

Some things to note:

  1. The instructions say that the power LED is green, except that on my Arduino Nano the power LED is actually blue.
  2. The driver installation on Windows 8 'just worked', I didn't need to install any drivers, Windows found them automatically and installed the Arduino as a USB Serial Port on COM3.
  3. The instructions for the example say that the LED labeled 'L' will blink orange, on my Nano, that LED is white and so it just blinks white.
That was basically it.  After following those instructions (which were pretty simple) I was able to get code running on the Arduino.  It took all of 15 minutes.

Now I just need to get some of the other hardware so I can actually do something with it.

Monday, December 24, 2012

The Hows and Whys of Rooting the Droid Razr

There's no standard way of getting root access to an Android device.  I currently want to root a Droid Razr running 4.0.4 and I found some instructions for how to do so here.  The rooting process is nice in that it doesn't require running any special code that some Internet rando developed, but the instructions don't actually say what is going on.

Since I can be a little paranoid, I'm not about to run whatever commands someone on the internet tells me to.  First, I want to figure out what those commands are doing.

(Note that while the instructions work for the most part, they originally said to put the su binary in /system/xbin, I found that it actually needed to be placed in /system/bin and I've changed these instructions accordingly).

So let's get in to it, going step by step through the commands outlined in the instructions.

Hook your phone up to your computer in debugging mode and connect to it with adb.

adb shell

# cd /sdcard
# cp su /data/local/12m/
# cp debugfs /data/local/12m/

These commands are copying the su and debugfs programs from your sdcard to a local directory on your phone where they can be used later.  su, as I'm sure you all know, is a program that allows a user to elevate their privilege level to root under the right conditions.  debugfs isn't quite as common.  It allows the user to easily examine and modify characteristics of the filesystem.  In this case it will allow us to change permissions as a part of the rooting process.  It isn't clear to me where the best place to get these programs is, so I'll leave that to you.

# cd /data/local/12m
# chmod 755 su
# chmod 755 debugfs

Here we're making sure any user can read and execute su and debugfs. Pretty standard stuff.

# mv batch batch.bak
# ln -s /dev/block/mmcblk1p20 batch

This is a little strange. Why are we moving 'batch' and replacing it with a link to some random device?

We'll start with looking at what exactly /dev/block/mmcblk1p20 is.

cat /proc/partitions
major minor  #blocks  name      alias

   7        1      17703 loop1
 179        0   15552512 mmcblk1
 179        1        128 mmcblk1p1
 179        2        512 mmcblk1p2
 179        3        512 mmcblk1p3
 179        4          1 mmcblk1p4
 179        5        512 mmcblk1p5
 179        6        512 mmcblk1p6
 179        7       4096 mmcblk1p7      pds
 179        8        512 mmcblk1p8      utags
 179        9       1024 mmcblk1p9
 179       10       2048 mmcblk1p10
 179       11        512 mmcblk1p11
 179       12        512 mmcblk1p12
 179       13       4096 mmcblk1p13
 179       14       8192 mmcblk1p14     boot
 179       15       9216 mmcblk1p15     recovery
 179       16     217088 mmcblk1p16     cdrom
 179       17        512 mmcblk1p17     misc
 179       18        512 mmcblk1p18     cid
 179       19       4096 mmcblk1p19     kpanic
 179       20     655360 mmcblk1p20     system
 179       21    1048576 mmcblk1p21     cache
 179       22     622592 mmcblk1p22     preinstall
 179       23    1364992 mmcblk1p23     webtop
 179       24    3203072 mmcblk1p24     userdata
 179       25    8401792 mmcblk1p25     emstorage
 179       26        128 mmcblk1p26
 179       64       1024 mmcblk1boot1
 179       32       1024 mmcblk1boot0
 179       96   15558144 mmcblk0
 179       97   15554048 mmcblk0p1
 254        1      17703 dm-1

We can see that mmcblk1p20 is an alias for 'system'.  Now, looking at the 'mount' output, we see that /dev/block/system is mounted to /system.

 mount
...
/dev/block/system /system ext3 ro,noatime,nodiratime,barrier=1,data=ordered 0 0
...

So we're making /data/local/12m/batch point to /system instead of whatever it pointed to before.  Why would we do that?

Now let's take a closer look at that the /data/local/12m directory:

 ls -l /data/local/12m
drwxrwx--x mot_tcmd shell             2011-10-20 22:48 batch


We can see that here the shell group has read, write and execute access.

According to djrbliss:
Since the contents of /data/local are group “shell” and group-writable, we can modify the contents of this directory using ADB. By logging into the device and replacing one of the sub-directories listed here with a symbolic link, then when the device reboots it will change the ownership of the symlink target to group “shell”. This can be used to edit property files to manipulate the behavior of ADB to achieve root.
So, by creating this symbolic link and rebooting the device, we're changing the permissions of /system to allow the shell group to have read and write access, which is exactly what we need to get root.

# exit
adb reboot

adb wait-for-device shell
Wait android shell:


Now that we've made those changes we reboot to get them to take effect.

# cd /data/local/12m
# rm batch
# mv batch.bak batch

This puts the batch directory back the way we found it; though /system will still have the updated permissions.

# /data/local/12m/debugfs -w /dev/block/mmcblk1p20
This opens the mmcblk1p20 device (that contains /system) in readwrite mode within debugfs.

Now, at the debugfs prompt:

debugfs: # cd bin
debugfs: # write /data/local/12m/su su
debugfs: # set_inode_field su mode 0104755
debugfs: # set_inode_field su uid 0
debugfs: # set_inode_field su gid 0
debugfs: # quit

This puts the su binary in /system/bin, sets to allow anyone to execute it, has the root user own it puts it in the root group.

# cd /data/local/12m
# rm su
# rm debugfs
# exit
adb reboot

This removes the temporary files we put in /data/local/12m and then reboots.  When the system comes back up, we should have root.

The rest of the instructions tell you how to install superuser, make sure you have root and how to keep it.  That's all pretty standard stuff, so I won't go in to it here.  Have fun.

Wednesday, December 5, 2012

Extending Existing Android Applications - Part Two

In the last post I explained how to pull an Android APK apart and get it set up in Eclipse and ready for development.  In this post I'll explain how we can modify the app, making both simple modifications as well as actually changing the code to add a new activity.

Prerequisites:


Modify Images:

This is a very simple tweak, but a good starting place.  When apktool took the APK apart it extracted all the images as well and stuck them in Eclipse.  They're found under res/drawable-*.  You can modify or replace them as you see fit, just change the file.

Modify Strings:

Somewhat more interesting is modifying the strings that are displayed or used.  This could be useful if, for example, you wanted to direct an application to a different URL than one it was originally programmed to contact.  Almost all of the strings in the code should be located in res/values/strings.xml.  Double click the strings.xml file to bring it up in the editor.  There you can see the values for various strings and change them to whatever you'd like.

Adding a new activity:

At this point we can add a new activity to the project and replace the project's main activity with our own.

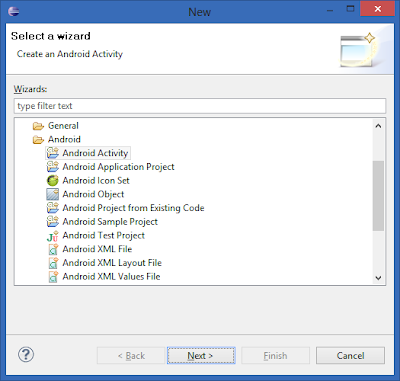
Right click on the project name on the left, select New -> Other
 
Choose 'Android Activity'

Click 'Next'
 
Finally, click 'Finish'.

Open the AndroidManifest.xml in text mode and move the new activity up so that it's the first activity.


Click 'Play' to start the code in the emulator.  This new activity should start instead of the original.

Reversing the original activity:

Of course, it isn't very fun to just replace the activity.  Really we want to integrate the new activity with the original application.  To do that we first have to reverse the original activity.
 
First, we want to know what the original main activity was.  Look in AndroidManifest.xml and find the original activity (don't be confused by the one you just added) with the intent-filter

<action android:name="android.intent.action.MAIN" />
 
Note the 'android:name' of the activity.  That's the name of the first activity that gets started by Android.  Here it's 'GasMileageApp'.  We need to find and reverse it if we want to add our own stuff.
 
We'll use JDGui to do the actual reversing.  JDGui is the Java Decompiler (there's also an Eclipse plugin, but it's not as easy to set up).
 
Start JDGui and open the jar file that dex2jar created.
 
Find the original activity on the left and open it up.
 
This is the (reversed) code for the original app as it sits in the jar file that's being used to run the program.
 
You'll notice that some things are a little arcane (like the 213090342 number used in setContentView).  That's because Android uses a lot of numeric constants for things and JDGui just sees it as a number and can't necessarily resolve it back to the thing it actually refers to.  That's OK though, it should still work for us, but it may make it harder to figure out exactly what's going on.
 
Now we need to figure out how to modify this.
 

Create your own version:

To create our own version we'll actually create a new class with this exact name (and Java namespace) in Eclipse and then we'll cut and paste the code from JDGui in to that file.
 
 
If we compiled and ran this now, we'd run in to a problem; we'd have two copies of GasMileageApp.class.  One is from the dex2jar'd jar file we created the other is the one that Eclipse compiled from this source code.  So, we need to get rid of the one from the dex2jar file.
 
To do that, open the dex2jar'd jar file in 7zip (or your favorite zip utility) and delete na/hennen/gasmileage/GasMileageApp.class.
 
 
Now that it's been deleted, go back to AndroidManifest.xml in text mode and move the activity you added before (the default name is MainActivity) back to the bottom where it started.  This will let GasMileageApp be the first activity that starts, which is exactly what we want.
 
Everything should be in working order now.  Run the program again just to make sure.  You should see the original GasMileageApp screen and not the new activity.
 

Add your activity to the tabs at the top:

So, we still don't have our own activity in there doing anything.  To do that we need to understand how GasMileageApp is doing it.
 
The important part is the onCreate() function.

public void onCreate(Bundle paramBundle)
{
    super.onCreate(paramBundle);
    setContentView(2130903042);
    GasMileage.create(this);
    getResources();
    TabHost localTabHost = getTabHost();
    Intent localIntent1 = new Intent().setClass(this, SummaryActivity.class);
    localTabHost.addTab(localTabHost.newTabSpec("Summary").setIndicator("Summary", null).setContent(localIntent1));
    Intent localIntent2 = new Intent().setClass(this, FillUpActivity.class);
    localTabHost.addTab(localTabHost.newTabSpec("fillup").setIndicator("Fill Up", null).setContent(localIntent2));
    Intent localIntent3 = new Intent().setClass(this, HistoryActivity.class);
    localTabHost.addTab(localTabHost.newTabSpec("history").setIndicator("History", null).setContent(localIntent3));
    localTabHost.setCurrentTab(0);
}


Here we can see that it's adding the 'Summary', 'Fill Up' and 'History' activities by creating new TabSpecs.  We can just copy one of these lines and update it to add our own activity.
 
So, add the following after the last call to addTab.
 
Intent localIntent4 = new Intent().setClass(this, MainActivity.class);
localTabHost.addTab(localTabHost
  .newTabSpec("hello")
  .setIndicator("Hello World", null)
  .setContent(localIntent4));
 
That's all we need to do.  Run the application and click on the new 'Hello World' tab.
 

Before:

After:


Wrapping up:

Now that we have our own activity integrated with the rest of the application we can just write Java code to make any changes we want.  If you need to change an existing class you've seen how to do that using JDGui to get the original code and how you can then put that code in Eclipse and modify it as needed.
 
The benefit of this method (as opposed to modifying the Smali files) is that you get to make your changes in Java and in the normal Android development environment.  That means you can make more than just minor tweaks.  You can add entirely new activities with new user interfaces.
 
Have fun...

Wednesday, November 21, 2012

Extending Existing Android Applications - Part One

There are a couple tutorials out there that show you how to reverse engineer Android applications.  Usually these leave you with smali files which you can modify and recompile or they leave you with a .jar file that you can browse with a Java decompiler.  Both of these methods leave something to be desired, namely; a good environment for writing new code.

Smali files are a reliable representation of the code, but they're hard to use and they don't integrate with Eclipse and the typical development environment an Android developer is used to.  Generating a jar file is more desirable.  Of course, we need more than just the jar to compile the app; we also need its resources and the android manifest.

Most tutorials focus on either apktool to get the smali files and the resources or dex2jar to get a jar file which can then be decompiled.  Here I'm going to demonstrate how to use both apktool and dex2jar together with Eclipse to reverse and then extend an Android app.  The end result will be a development environment that is easy to use and should allow major changes to be made to the app without any significant hardship.

Prerequisites:

Step One: Get the application's APK

The APK file is how Android apps are stored on your device.  Before we can do anything else we need to have the application's APK.  There are a couple ways to get this file, but we're not going to get in to them here.

For the purposes of this article I'll be using an APK from a simple app of my own, GasMileage.apk.

Step Two: Deconstruct the APK with apktool

To deconstruct the APK with apktool, run the following command:

apktool.bat d <path to apk> <destination directory name>

Note that the destination directory shouldn't exist until you run this command.

Example:
C:\play\inyourbits>apktool\apktool.bat d c:\play\inyourbits\GasMileage.apk GasMileage
I: Baksmaling...
testI: Loading resource table...
I: Loaded.
I: Loading resource table from file: C:\Users\Tom\apktool\framework\1.apk
I: Loaded.
I: Decoding file-resources...
I: Decoding values*/* XMLs...
I: Done.
I: Copying assets and libs...
In the destination folder we now have:
  • AndroidManifest.xml
  • apktool.yml
  • res
  • smali

Step Three: Generate a jar file from the APK

To create the jar file, use the following command:

d2j-dex2jar.bat <path to apk>

Example:
C:\play\inyourbits>dex2jar-0.0.9.9\d2j-dex2jar.bat GasMileage.apk
dex2jar GasMileage.apk -> GasMileage-dex2jar.jar
In the working directory we now have 'GasMileage-dex2jar.jar.'

Step Four:  Move the jar file

Move the jar file in to the destination directory created by apktool.

The directory should now contain:
  • AndroidManifest.xml
  • apktool.yml
  • res
  • smali
  • GasMileage-dex2jar.jar 

Step Five: Import the directory in to Eclipse 

Import the directory in eclipse as an Android project.
  • Click File->Import
  • Select 'Android->Existing Android Code Into Workspace'

  • Enter the path to your destination directory, in this case 'C:\play\inyourbits\GasMileage'

  • Click 'Finish'

Step Six: Import the Jar as a library

  • Right click on the project name
  • Click 'Properties'
  • Click 'Java Build Path'
  • Select 'Libraries'

  • Click 'Add JARs'
  • Select the dex2jar jar file

  • Click 'OK'
  • Click 'Order and Export'
  • Check the box next to the dex2jar
    • If we didn't do this then when we built our app the .jar file wouldn't be included with it


Step Seven: Remove the resources from the jar

The jar file created with dex2jar contains the resources classes, however Eclipse is going to build those resources fresh when it compiles the project.  So, we need to remove the resource files from the jar file so that the compilation works.
  • Open the dex2jar jar file with 7zip (or another zip utility)
  • Navigate through the hierarchy until you find the resource class files
    • There will be a number of R$ classes as well as one R.class

  • Delete all of the resource class files

  • Close the jar file

Step Eight: Run the app in the emulator

Now we're going to run the app in the Android emulator to make sure everything is working properly.
  • Select the project in Package Explorer
  • Click 'Run->Run'
  • When asked choose 'Android Application'

  • Click 'OK'
  • Wait until the application starts and make sure it works

Note: there are some APKs that this method does not work for due to flaws in the dex2jar process.

Next Time

Now that we've taken the application apart and put it back together again we can begin the process of actually modifying the behavior of the program.  We'll cover that in the next post.