Monday, December 24, 2012

The Hows and Whys of Rooting the Droid Razr

There's no standard way of getting root access to an Android device.  I currently want to root a Droid Razr running 4.0.4 and I found some instructions for how to do so here.  The rooting process is nice in that it doesn't require running any special code that some Internet rando developed, but the instructions don't actually say what is going on.

Since I can be a little paranoid, I'm not about to run whatever commands someone on the internet tells me to.  First, I want to figure out what those commands are doing.

(Note that while the instructions work for the most part, they originally said to put the su binary in /system/xbin, I found that it actually needed to be placed in /system/bin and I've changed these instructions accordingly).

So let's get in to it, going step by step through the commands outlined in the instructions.

Hook your phone up to your computer in debugging mode and connect to it with adb.

adb shell

# cd /sdcard
# cp su /data/local/12m/
# cp debugfs /data/local/12m/

These commands are copying the su and debugfs programs from your sdcard to a local directory on your phone where they can be used later.  su, as I'm sure you all know, is a program that allows a user to elevate their privilege level to root under the right conditions.  debugfs isn't quite as common.  It allows the user to easily examine and modify characteristics of the filesystem.  In this case it will allow us to change permissions as a part of the rooting process.  It isn't clear to me where the best place to get these programs is, so I'll leave that to you.

# cd /data/local/12m
# chmod 755 su
# chmod 755 debugfs

Here we're making sure any user can read and execute su and debugfs. Pretty standard stuff.

# mv batch batch.bak
# ln -s /dev/block/mmcblk1p20 batch

This is a little strange. Why are we moving 'batch' and replacing it with a link to some random device?

We'll start with looking at what exactly /dev/block/mmcblk1p20 is.

cat /proc/partitions
major minor  #blocks  name      alias

   7        1      17703 loop1
 179        0   15552512 mmcblk1
 179        1        128 mmcblk1p1
 179        2        512 mmcblk1p2
 179        3        512 mmcblk1p3
 179        4          1 mmcblk1p4
 179        5        512 mmcblk1p5
 179        6        512 mmcblk1p6
 179        7       4096 mmcblk1p7      pds
 179        8        512 mmcblk1p8      utags
 179        9       1024 mmcblk1p9
 179       10       2048 mmcblk1p10
 179       11        512 mmcblk1p11
 179       12        512 mmcblk1p12
 179       13       4096 mmcblk1p13
 179       14       8192 mmcblk1p14     boot
 179       15       9216 mmcblk1p15     recovery
 179       16     217088 mmcblk1p16     cdrom
 179       17        512 mmcblk1p17     misc
 179       18        512 mmcblk1p18     cid
 179       19       4096 mmcblk1p19     kpanic
 179       20     655360 mmcblk1p20     system
 179       21    1048576 mmcblk1p21     cache
 179       22     622592 mmcblk1p22     preinstall
 179       23    1364992 mmcblk1p23     webtop
 179       24    3203072 mmcblk1p24     userdata
 179       25    8401792 mmcblk1p25     emstorage
 179       26        128 mmcblk1p26
 179       64       1024 mmcblk1boot1
 179       32       1024 mmcblk1boot0
 179       96   15558144 mmcblk0
 179       97   15554048 mmcblk0p1
 254        1      17703 dm-1

We can see that mmcblk1p20 is an alias for 'system'.  Now, looking at the 'mount' output, we see that /dev/block/system is mounted to /system.

 mount
...
/dev/block/system /system ext3 ro,noatime,nodiratime,barrier=1,data=ordered 0 0
...

So we're making /data/local/12m/batch point to /system instead of whatever it pointed to before.  Why would we do that?

Now let's take a closer look at that the /data/local/12m directory:

 ls -l /data/local/12m
drwxrwx--x mot_tcmd shell             2011-10-20 22:48 batch


We can see that here the shell group has read, write and execute access.

According to djrbliss:
Since the contents of /data/local are group “shell” and group-writable, we can modify the contents of this directory using ADB. By logging into the device and replacing one of the sub-directories listed here with a symbolic link, then when the device reboots it will change the ownership of the symlink target to group “shell”. This can be used to edit property files to manipulate the behavior of ADB to achieve root.
So, by creating this symbolic link and rebooting the device, we're changing the permissions of /system to allow the shell group to have read and write access, which is exactly what we need to get root.

# exit
adb reboot

adb wait-for-device shell
Wait android shell:


Now that we've made those changes we reboot to get them to take effect.

# cd /data/local/12m
# rm batch
# mv batch.bak batch

This puts the batch directory back the way we found it; though /system will still have the updated permissions.

# /data/local/12m/debugfs -w /dev/block/mmcblk1p20
This opens the mmcblk1p20 device (that contains /system) in readwrite mode within debugfs.

Now, at the debugfs prompt:

debugfs: # cd bin
debugfs: # write /data/local/12m/su su
debugfs: # set_inode_field su mode 0104755
debugfs: # set_inode_field su uid 0
debugfs: # set_inode_field su gid 0
debugfs: # quit

This puts the su binary in /system/bin, sets to allow anyone to execute it, has the root user own it puts it in the root group.

# cd /data/local/12m
# rm su
# rm debugfs
# exit
adb reboot

This removes the temporary files we put in /data/local/12m and then reboots.  When the system comes back up, we should have root.

The rest of the instructions tell you how to install superuser, make sure you have root and how to keep it.  That's all pretty standard stuff, so I won't go in to it here.  Have fun.

Wednesday, December 5, 2012

Extending Existing Android Applications - Part Two

In the last post I explained how to pull an Android APK apart and get it set up in Eclipse and ready for development.  In this post I'll explain how we can modify the app, making both simple modifications as well as actually changing the code to add a new activity.

Prerequisites:


Modify Images:

This is a very simple tweak, but a good starting place.  When apktool took the APK apart it extracted all the images as well and stuck them in Eclipse.  They're found under res/drawable-*.  You can modify or replace them as you see fit, just change the file.

Modify Strings:

Somewhat more interesting is modifying the strings that are displayed or used.  This could be useful if, for example, you wanted to direct an application to a different URL than one it was originally programmed to contact.  Almost all of the strings in the code should be located in res/values/strings.xml.  Double click the strings.xml file to bring it up in the editor.  There you can see the values for various strings and change them to whatever you'd like.

Adding a new activity:

At this point we can add a new activity to the project and replace the project's main activity with our own.

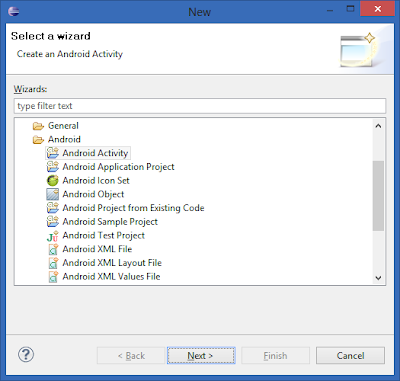
Right click on the project name on the left, select New -> Other
 
Choose 'Android Activity'

Click 'Next'
 
Finally, click 'Finish'.

Open the AndroidManifest.xml in text mode and move the new activity up so that it's the first activity.


Click 'Play' to start the code in the emulator.  This new activity should start instead of the original.

Reversing the original activity:

Of course, it isn't very fun to just replace the activity.  Really we want to integrate the new activity with the original application.  To do that we first have to reverse the original activity.
 
First, we want to know what the original main activity was.  Look in AndroidManifest.xml and find the original activity (don't be confused by the one you just added) with the intent-filter

<action android:name="android.intent.action.MAIN" />
 
Note the 'android:name' of the activity.  That's the name of the first activity that gets started by Android.  Here it's 'GasMileageApp'.  We need to find and reverse it if we want to add our own stuff.
 
We'll use JDGui to do the actual reversing.  JDGui is the Java Decompiler (there's also an Eclipse plugin, but it's not as easy to set up).
 
Start JDGui and open the jar file that dex2jar created.
 
Find the original activity on the left and open it up.
 
This is the (reversed) code for the original app as it sits in the jar file that's being used to run the program.
 
You'll notice that some things are a little arcane (like the 213090342 number used in setContentView).  That's because Android uses a lot of numeric constants for things and JDGui just sees it as a number and can't necessarily resolve it back to the thing it actually refers to.  That's OK though, it should still work for us, but it may make it harder to figure out exactly what's going on.
 
Now we need to figure out how to modify this.
 

Create your own version:

To create our own version we'll actually create a new class with this exact name (and Java namespace) in Eclipse and then we'll cut and paste the code from JDGui in to that file.
 
 
If we compiled and ran this now, we'd run in to a problem; we'd have two copies of GasMileageApp.class.  One is from the dex2jar'd jar file we created the other is the one that Eclipse compiled from this source code.  So, we need to get rid of the one from the dex2jar file.
 
To do that, open the dex2jar'd jar file in 7zip (or your favorite zip utility) and delete na/hennen/gasmileage/GasMileageApp.class.
 
 
Now that it's been deleted, go back to AndroidManifest.xml in text mode and move the activity you added before (the default name is MainActivity) back to the bottom where it started.  This will let GasMileageApp be the first activity that starts, which is exactly what we want.
 
Everything should be in working order now.  Run the program again just to make sure.  You should see the original GasMileageApp screen and not the new activity.
 

Add your activity to the tabs at the top:

So, we still don't have our own activity in there doing anything.  To do that we need to understand how GasMileageApp is doing it.
 
The important part is the onCreate() function.

public void onCreate(Bundle paramBundle)
{
    super.onCreate(paramBundle);
    setContentView(2130903042);
    GasMileage.create(this);
    getResources();
    TabHost localTabHost = getTabHost();
    Intent localIntent1 = new Intent().setClass(this, SummaryActivity.class);
    localTabHost.addTab(localTabHost.newTabSpec("Summary").setIndicator("Summary", null).setContent(localIntent1));
    Intent localIntent2 = new Intent().setClass(this, FillUpActivity.class);
    localTabHost.addTab(localTabHost.newTabSpec("fillup").setIndicator("Fill Up", null).setContent(localIntent2));
    Intent localIntent3 = new Intent().setClass(this, HistoryActivity.class);
    localTabHost.addTab(localTabHost.newTabSpec("history").setIndicator("History", null).setContent(localIntent3));
    localTabHost.setCurrentTab(0);
}


Here we can see that it's adding the 'Summary', 'Fill Up' and 'History' activities by creating new TabSpecs.  We can just copy one of these lines and update it to add our own activity.
 
So, add the following after the last call to addTab.
 
Intent localIntent4 = new Intent().setClass(this, MainActivity.class);
localTabHost.addTab(localTabHost
  .newTabSpec("hello")
  .setIndicator("Hello World", null)
  .setContent(localIntent4));
 
That's all we need to do.  Run the application and click on the new 'Hello World' tab.
 

Before:

After:


Wrapping up:

Now that we have our own activity integrated with the rest of the application we can just write Java code to make any changes we want.  If you need to change an existing class you've seen how to do that using JDGui to get the original code and how you can then put that code in Eclipse and modify it as needed.
 
The benefit of this method (as opposed to modifying the Smali files) is that you get to make your changes in Java and in the normal Android development environment.  That means you can make more than just minor tweaks.  You can add entirely new activities with new user interfaces.
 
Have fun...